
Coffee Salt Dough Ornaments (With Used Coffee Grounds)
Turn yesterday’s coffee grounds into cozy, kid-approved salt dough ornaments—budget-friendly, simple to make, and perfect for quick naptime crafting or holiday keepsakes.
- Article details
- By Sharon Nissley13 min readUpdated
Article contents
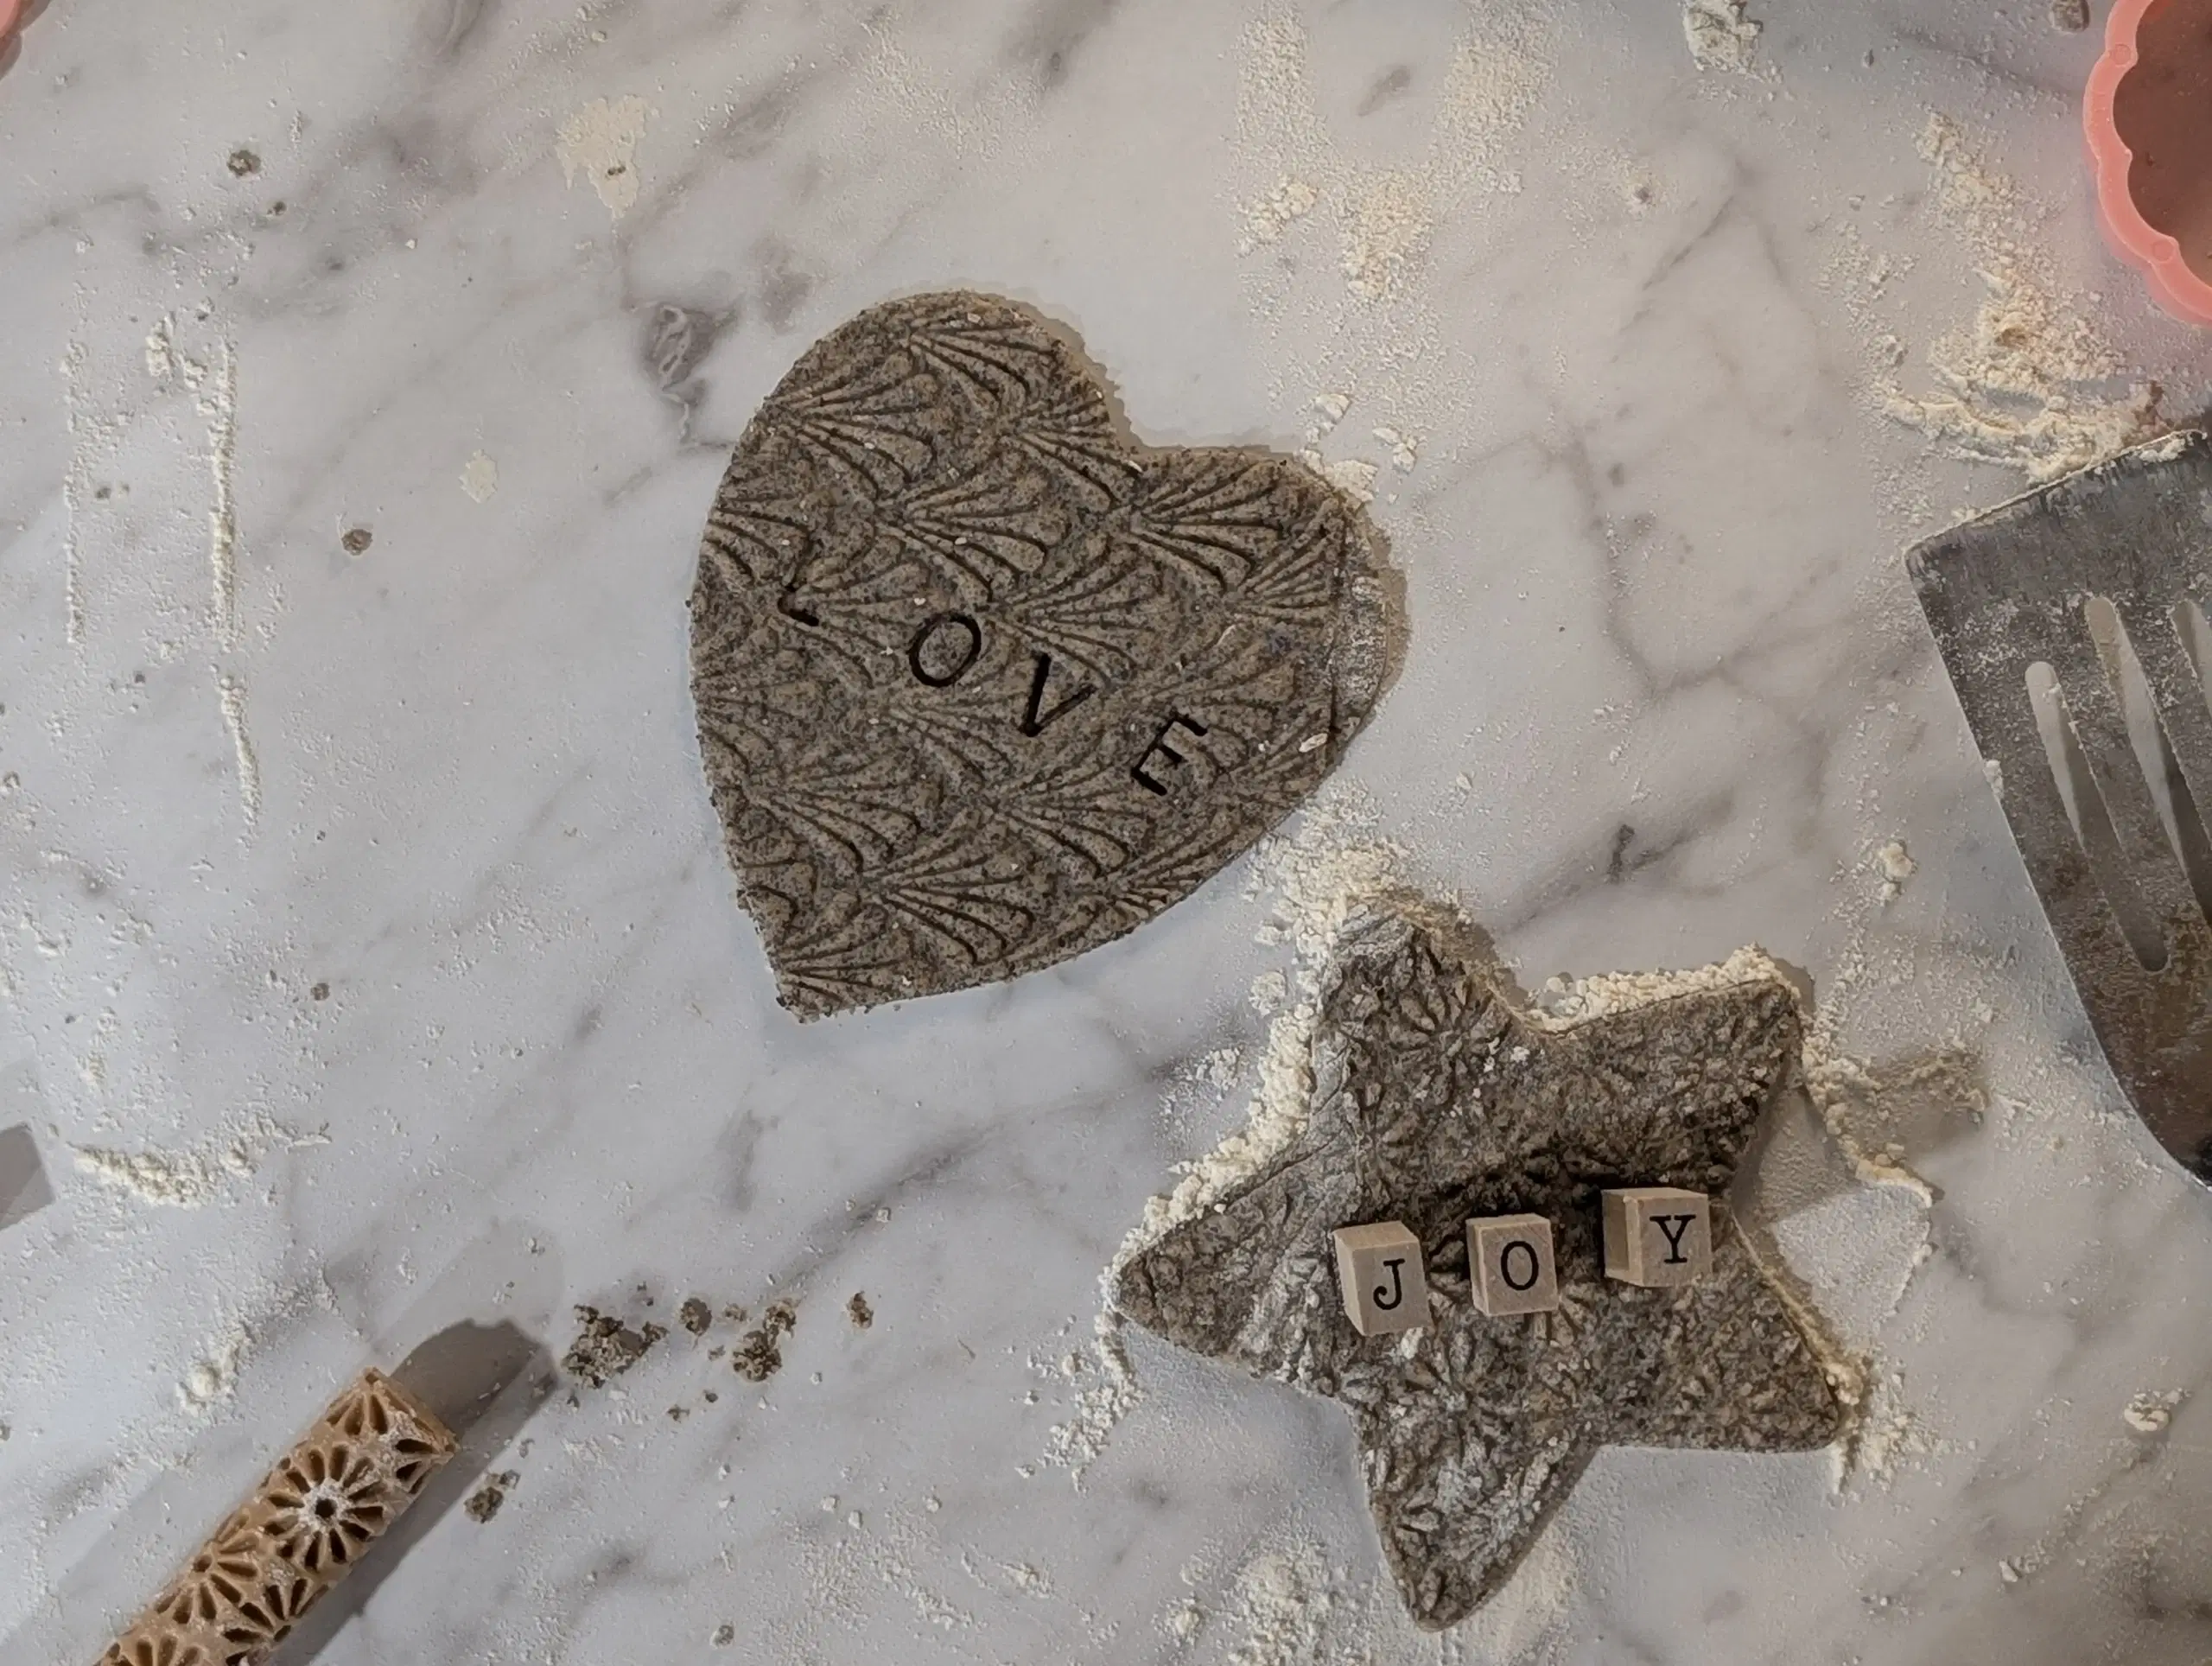
Right after the holidays I saw a pinterest pin where the blogger used coffee grounds in her salt dough. I was immediately intrigued how to incorporate something I use every single day into a fun craft for kids and I thought it was pretty too! My daughter and I tried out the first batch in January of
- She loved helping me measure all 4 ingredients into the bowl, mixing, rolling, and cutting out shapes. The texture was so unique and the color felt warm and cozy- a perfect winter craft. Once they dried I was surprised at how much my kid loved playing with a simple star cut out…until they fell and broke- oops! At least they are inexpensive and I can whip them up in less than half a day.
---
# Why You'll Love Coffee Ground Salt Dough Ornaments
There are a few reasons I enjoy this simple craft and I think you will too! First it’s extremely budget friendly. Assuming you already drink coffee that’s basically money back into your pocket-a double use should count for something like a lavender latte…or is that mom math? But if you have to buy and make coffee specifically for this purpose, you can buy some pretty cheap coffee.
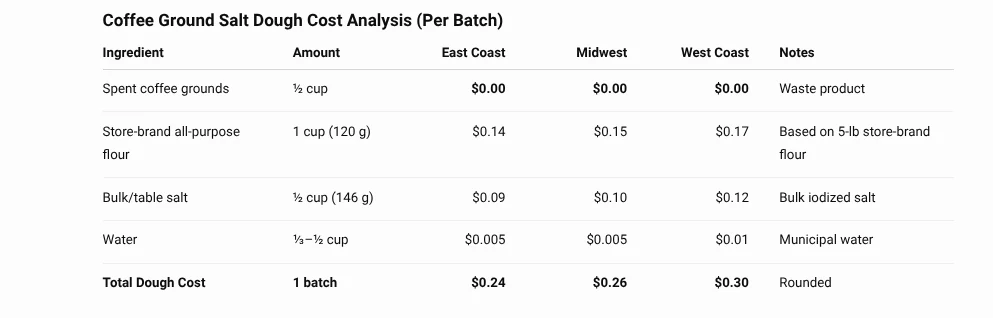
Cost per batch Breakdown: Let’s look at the cost per batch first:
That’s pretty remarkable to make an entire batch of anything for $0.30 or less anymore, especially something that has potential to be a sweet and thoughtful gift!.
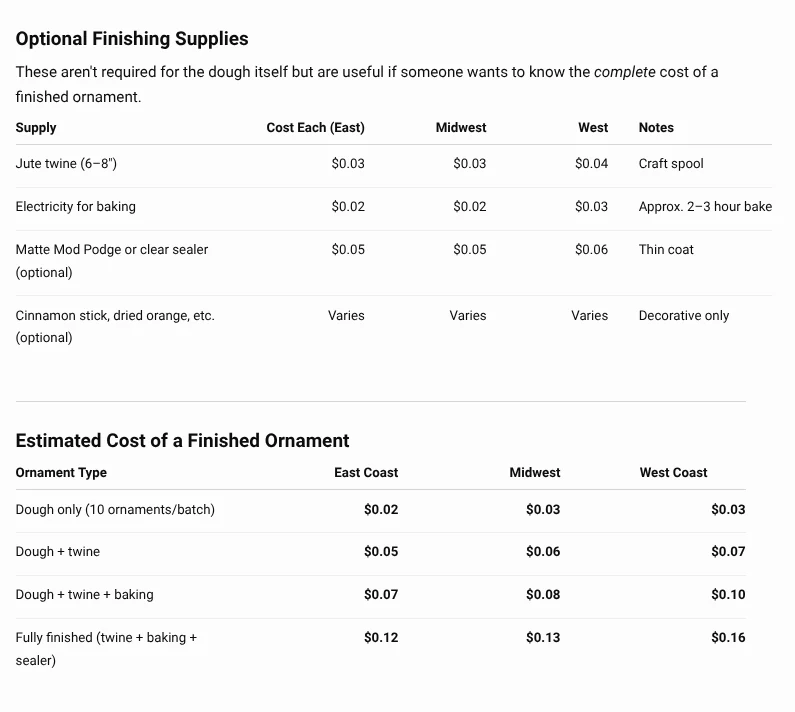
Now let’s take our cost analysis a step further (who doesn’t want to pinch pennies around the holidays??) Depending on how creative you want to be with your dough and how thin you choose to roll, you can get approximately 8-12 ornaments per batch! That’s less than $0.05 ornament!.

Even when you include the additional material costs such as jute twin, mod podge, and other decorative elements like dried orange or cinnamon sticks, the price is still less than $0.20 per ornament!
This is such a cute, recyclable, fun for all ages activity to do. Great for a Christmas activity, maybe an advent activity or also a great summer activity when it’s too hot to go outside or rainy. These don’t have to be ornaments but just cute keepsakes for kids.
Supplies You'll Need
Ingredients & Materials
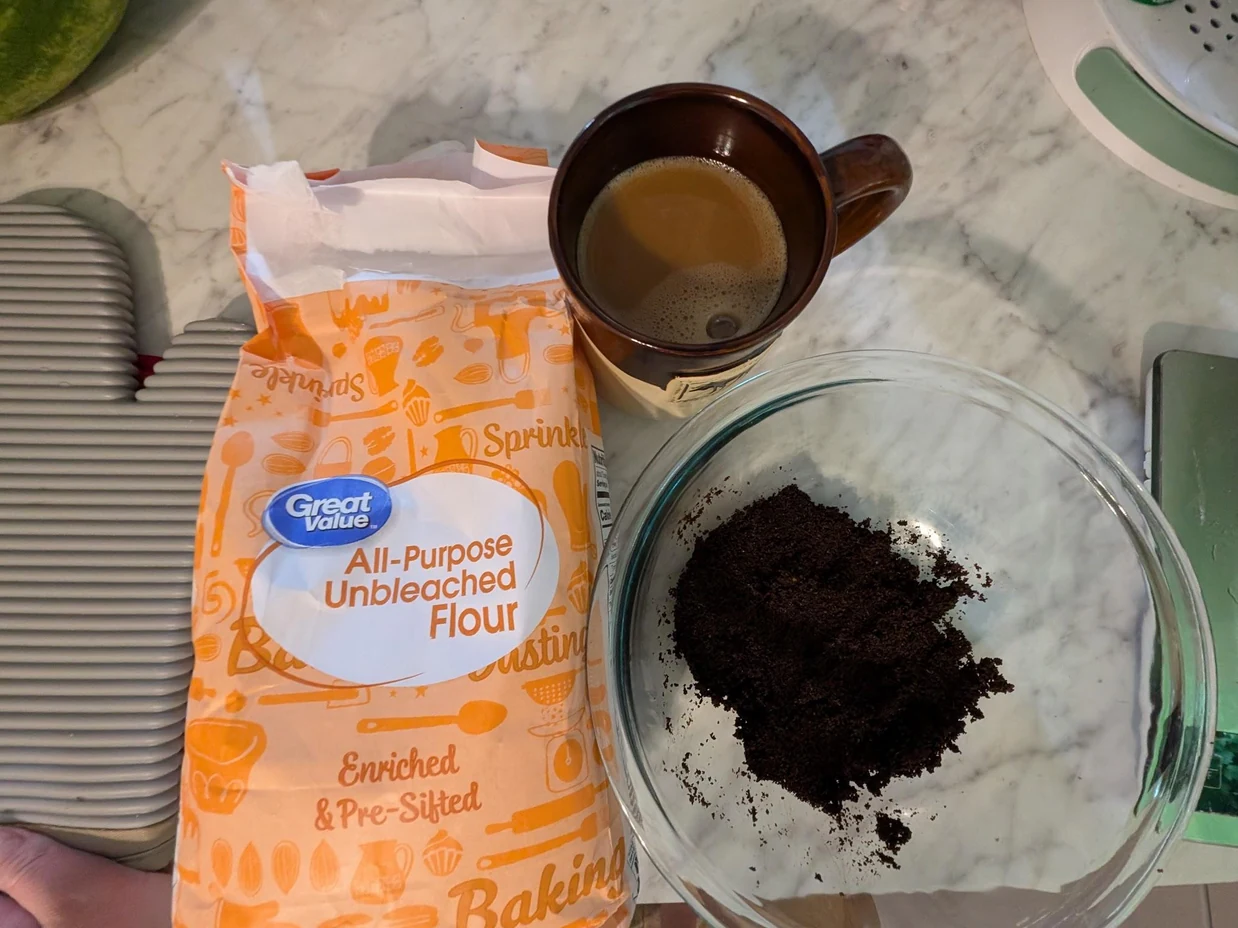
The basic ingredients are:
- All purpose flour
- Salt
- Water
- Coffee Grounds
- Medium-sized mixing bowl
- Spoon (although hands work well)
- Measuring cups or kitchen scale
- Baking Sheet
- Rolling pin
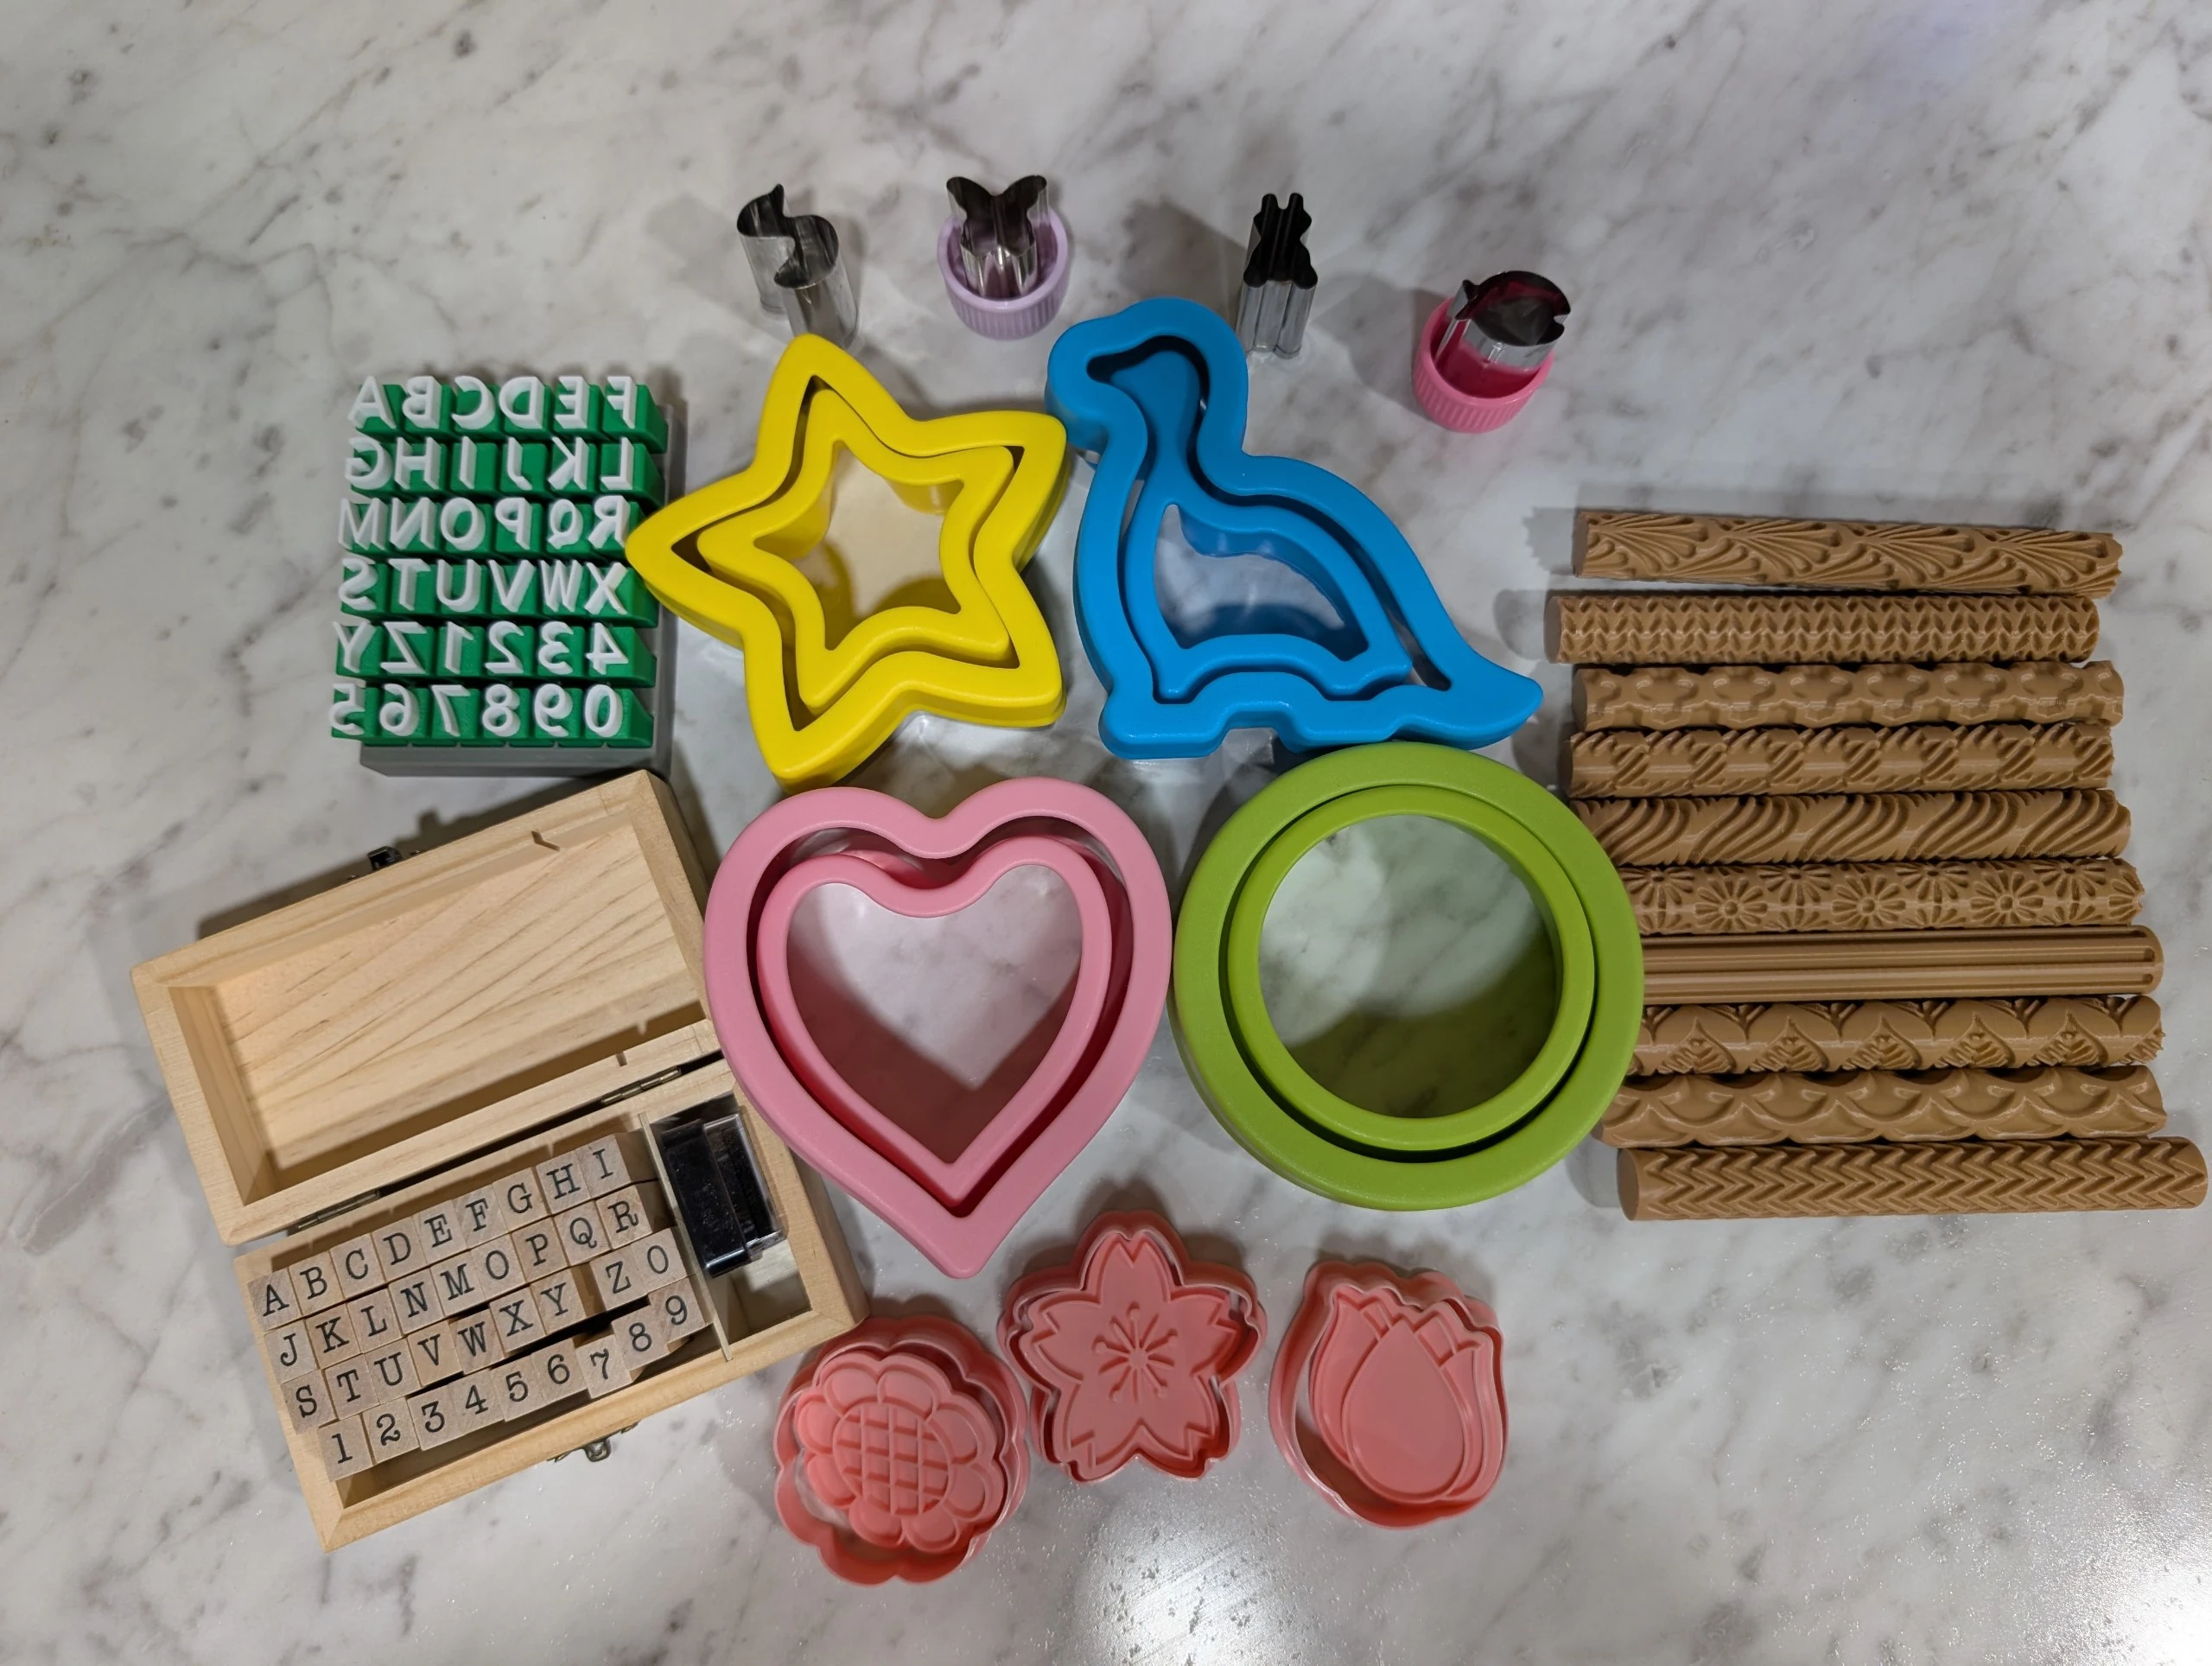
- Cookie cutters or other small cutters.
- Optional: textured rollers or letter stamp
---
# Why Coffee Grounds Work So Well in Salt Dough
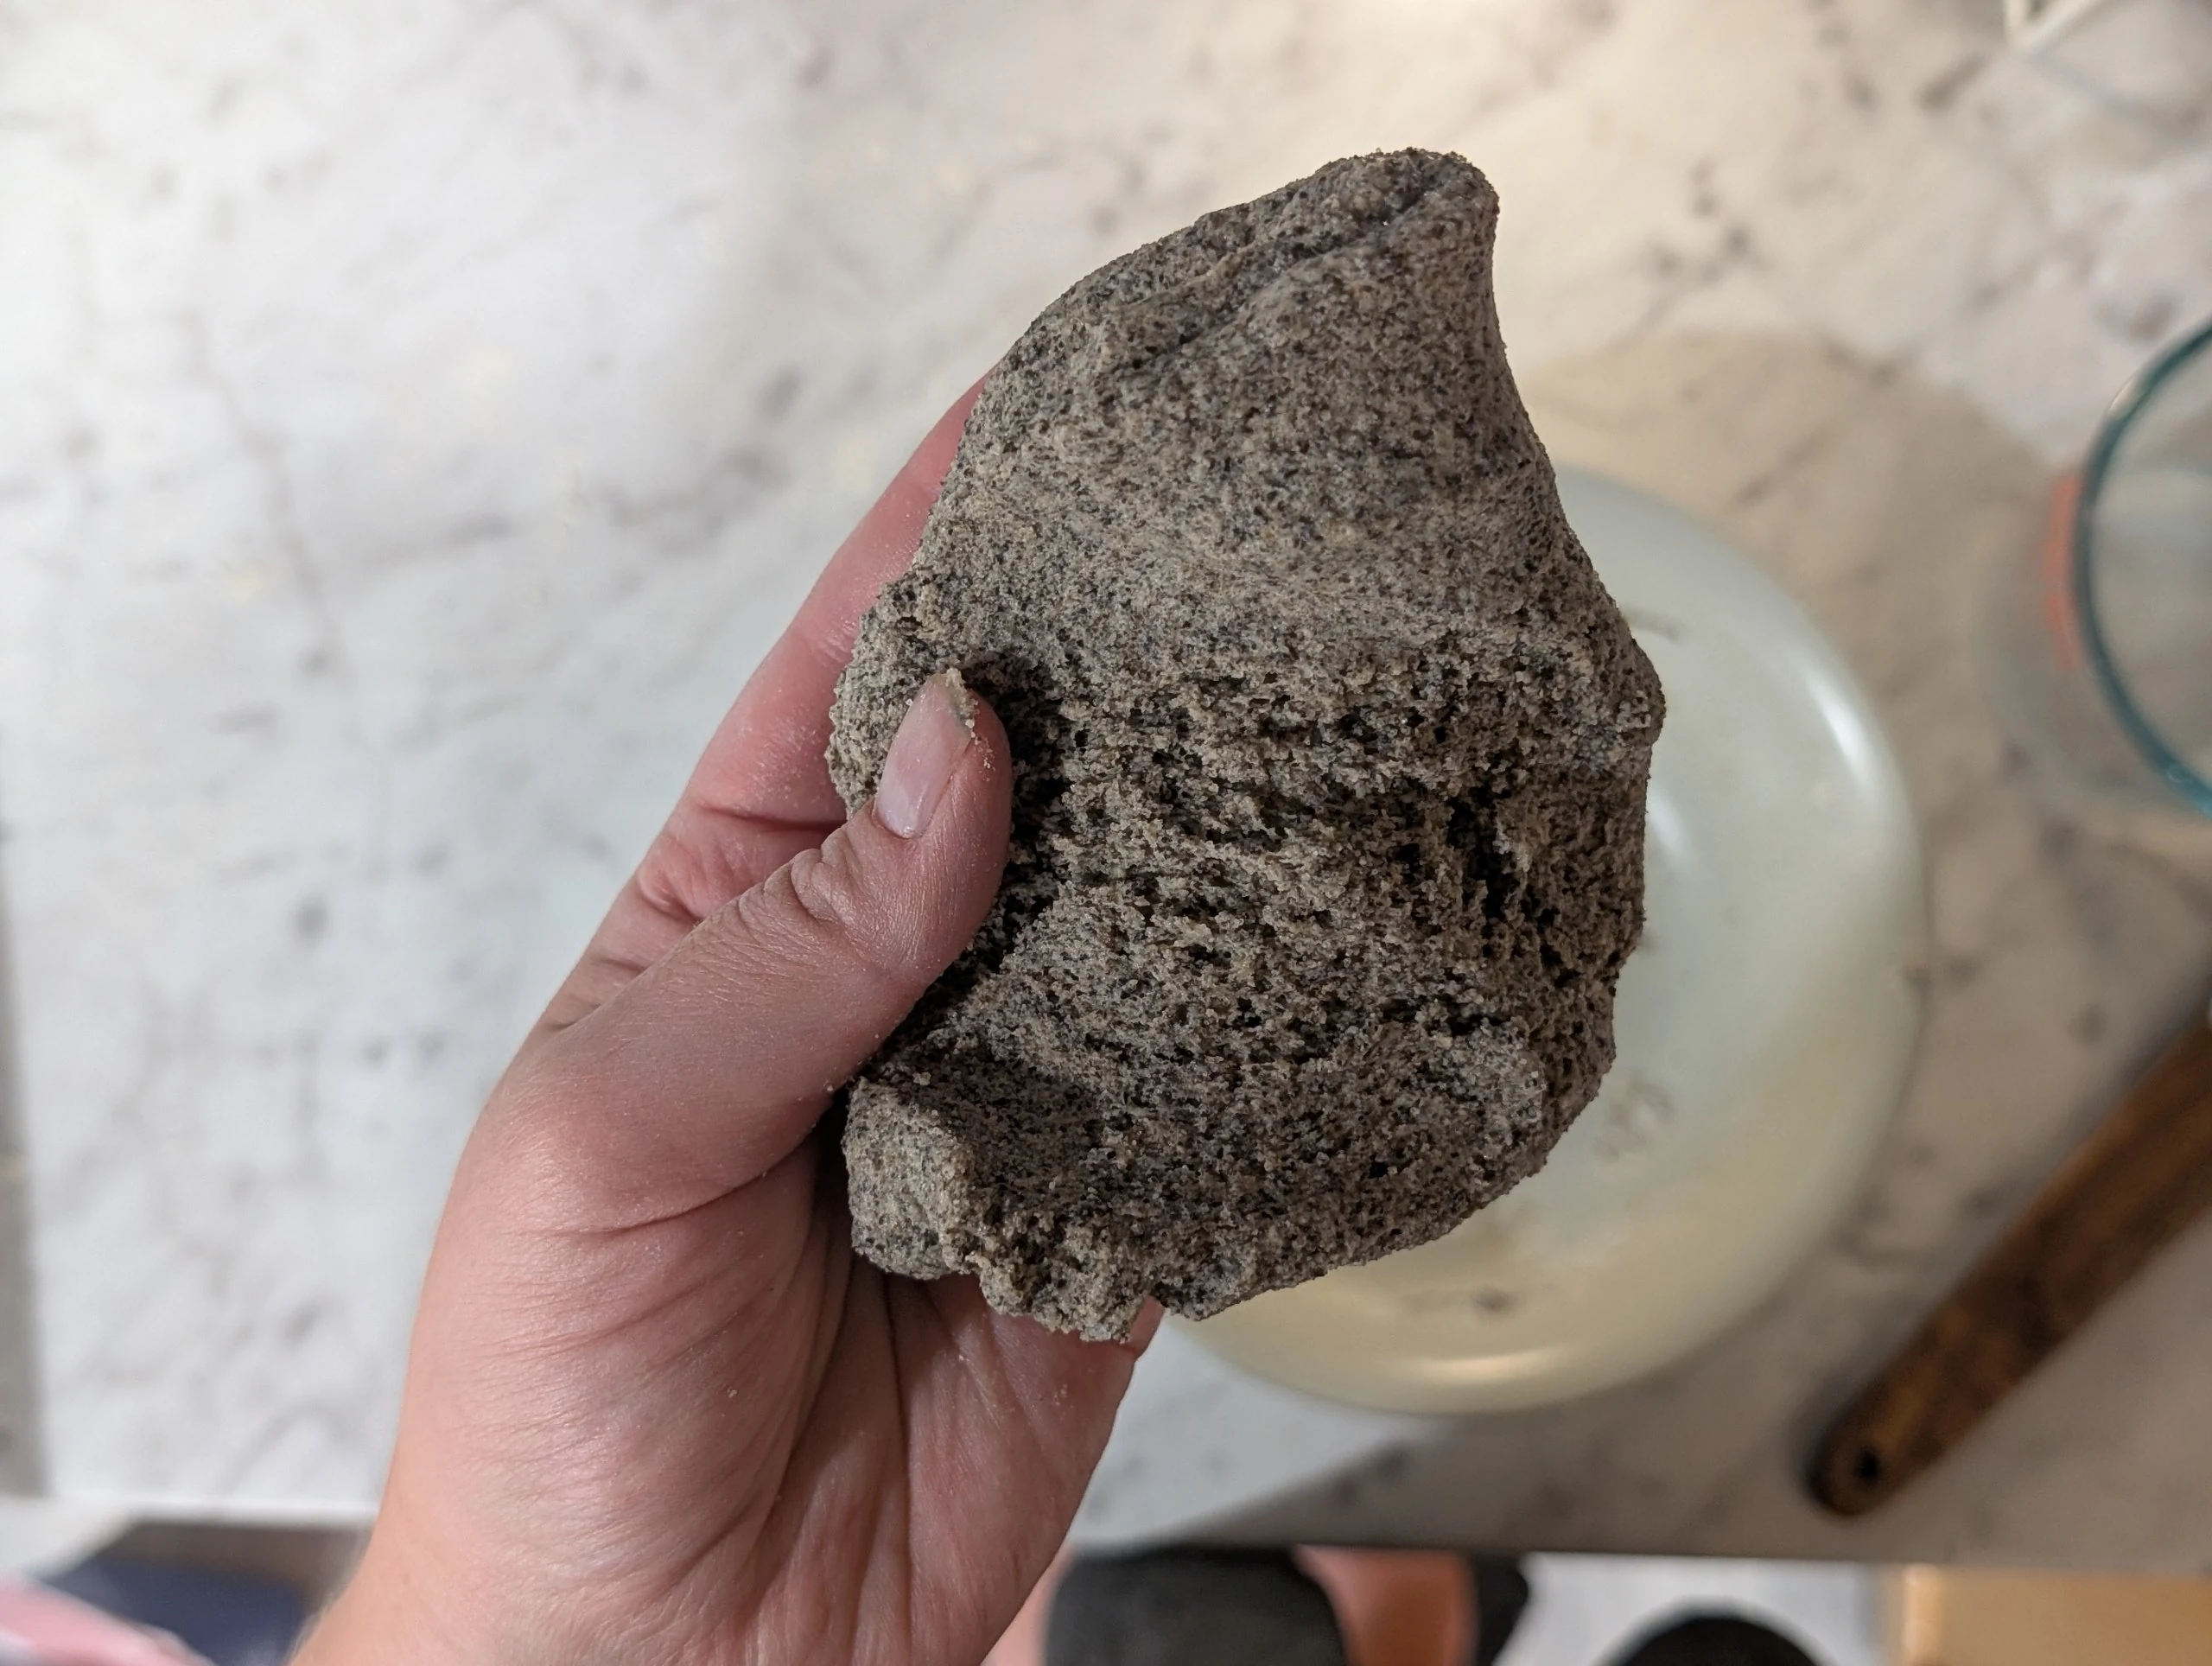
- Texture: Coffee grounds offer a unique and rustic texture that regular salt dough ornaments don’t offer. Even after rolling, you'll be able to see and feel some of the grounds throughout the ornament. Finer grounds give you a smoother result, while coarse grounds create more texture. It reminds me of Play Foam just more rigid.
- Color: Coffee grounds give the dough a charcoal/gray/brown hue. The exact shade will vary based on the brand and the type of roast you use (light vs dark).
- Moisture: Since the used coffee grounds already contain water from the brewing process, they add moisture to the dough. Squeeze/strain out the extra liquid as best as you can before adding them, and don't automatically add the full amount of water from a regular salt dough recipe. Start with less water and add more only if the dough needs it- and remember, a little water goes a LONG way!
---
# Step-by-Step Instructions
- Mix 1 cup flour and ½ cup salt in a medium-sized bowl. Add the coffee grounds and then slowly add ⅓ cup water and mix. Continue adding water slowly until the dough comes together. If it is crumbly, add extra water very slowly- like ½ teaspoon at a time. You’re trying to find the right balance of holding the dough together but not adding too much water, which will add bake time.
- Flour your surface and rolling pin
- Roll to ¼" thick
- Cut circles or any shapes and stamp with preferred design or words. I’ve used “Uncrustable cutters” instead of cookie cutters and they work great!
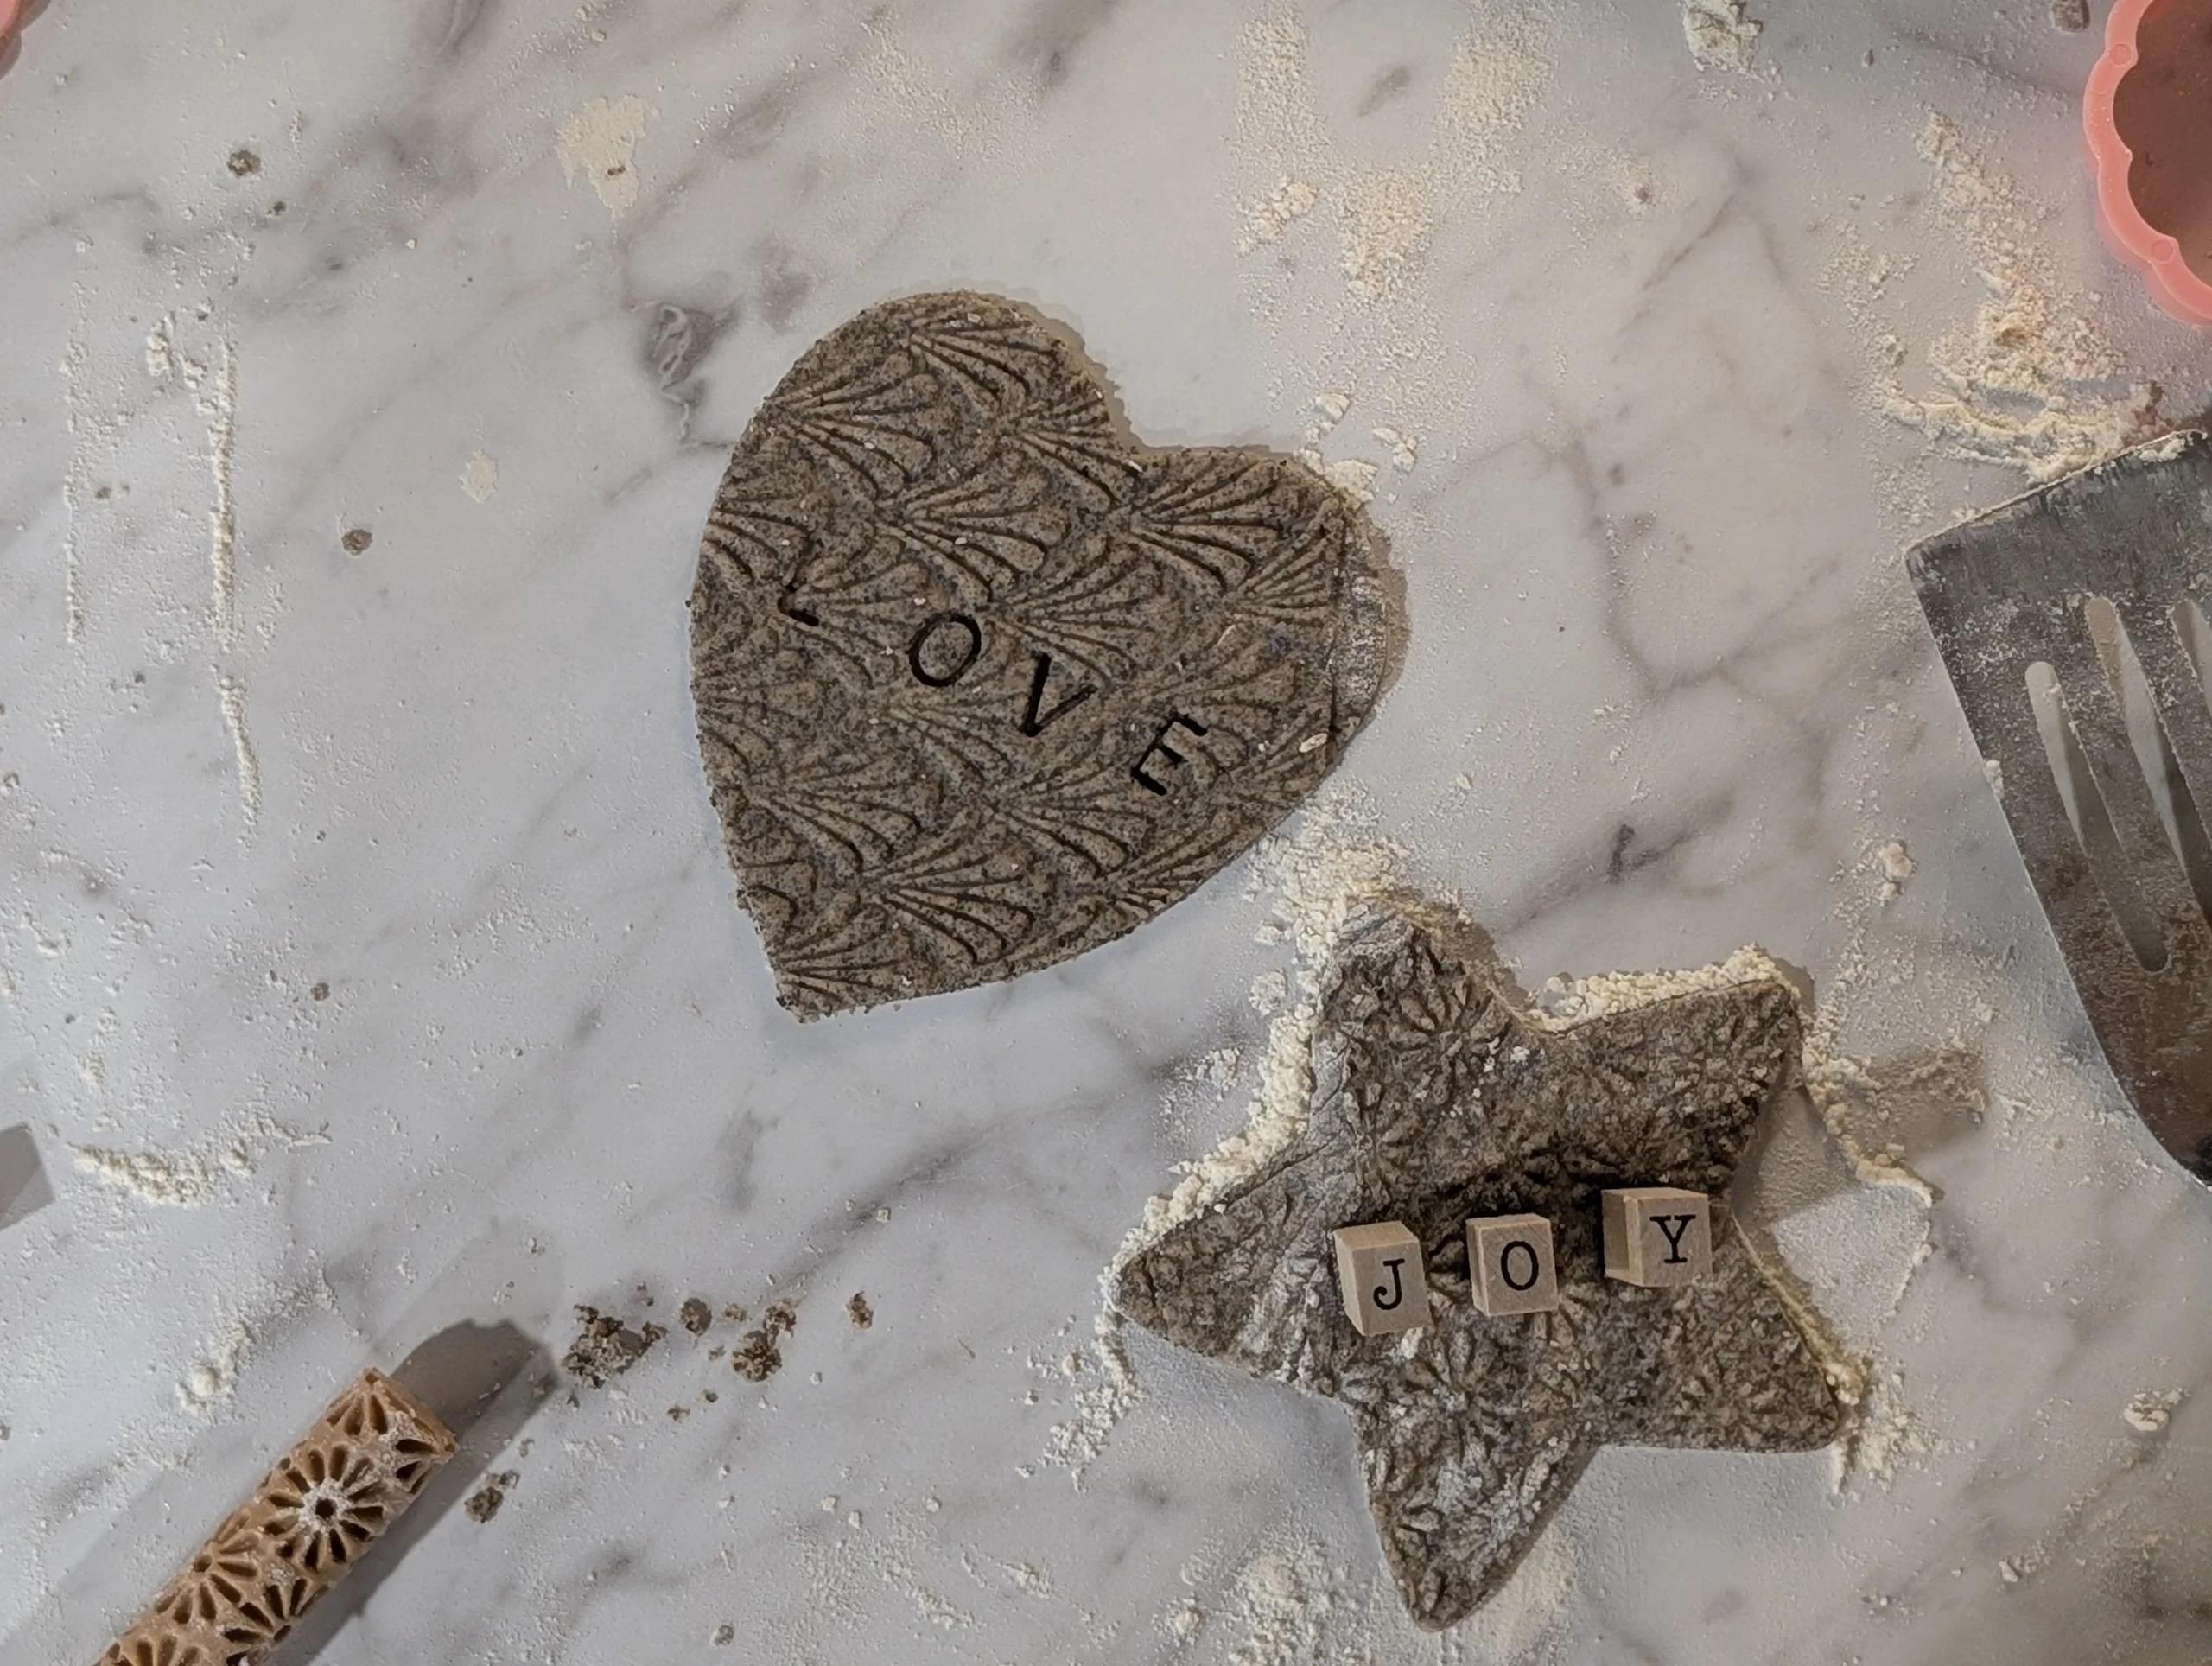
- Use a straw or toothpick (you’ll need to create a bigger opening if using a toothpick) to punch a hole for twine to hang as an ornament
- Bake at 200°F for 2-3 hours. If they’re thicker, they may need more time. I currently just have a nifty Breville Joule toaster oven instead of an actual full sized oven and it worked out great!
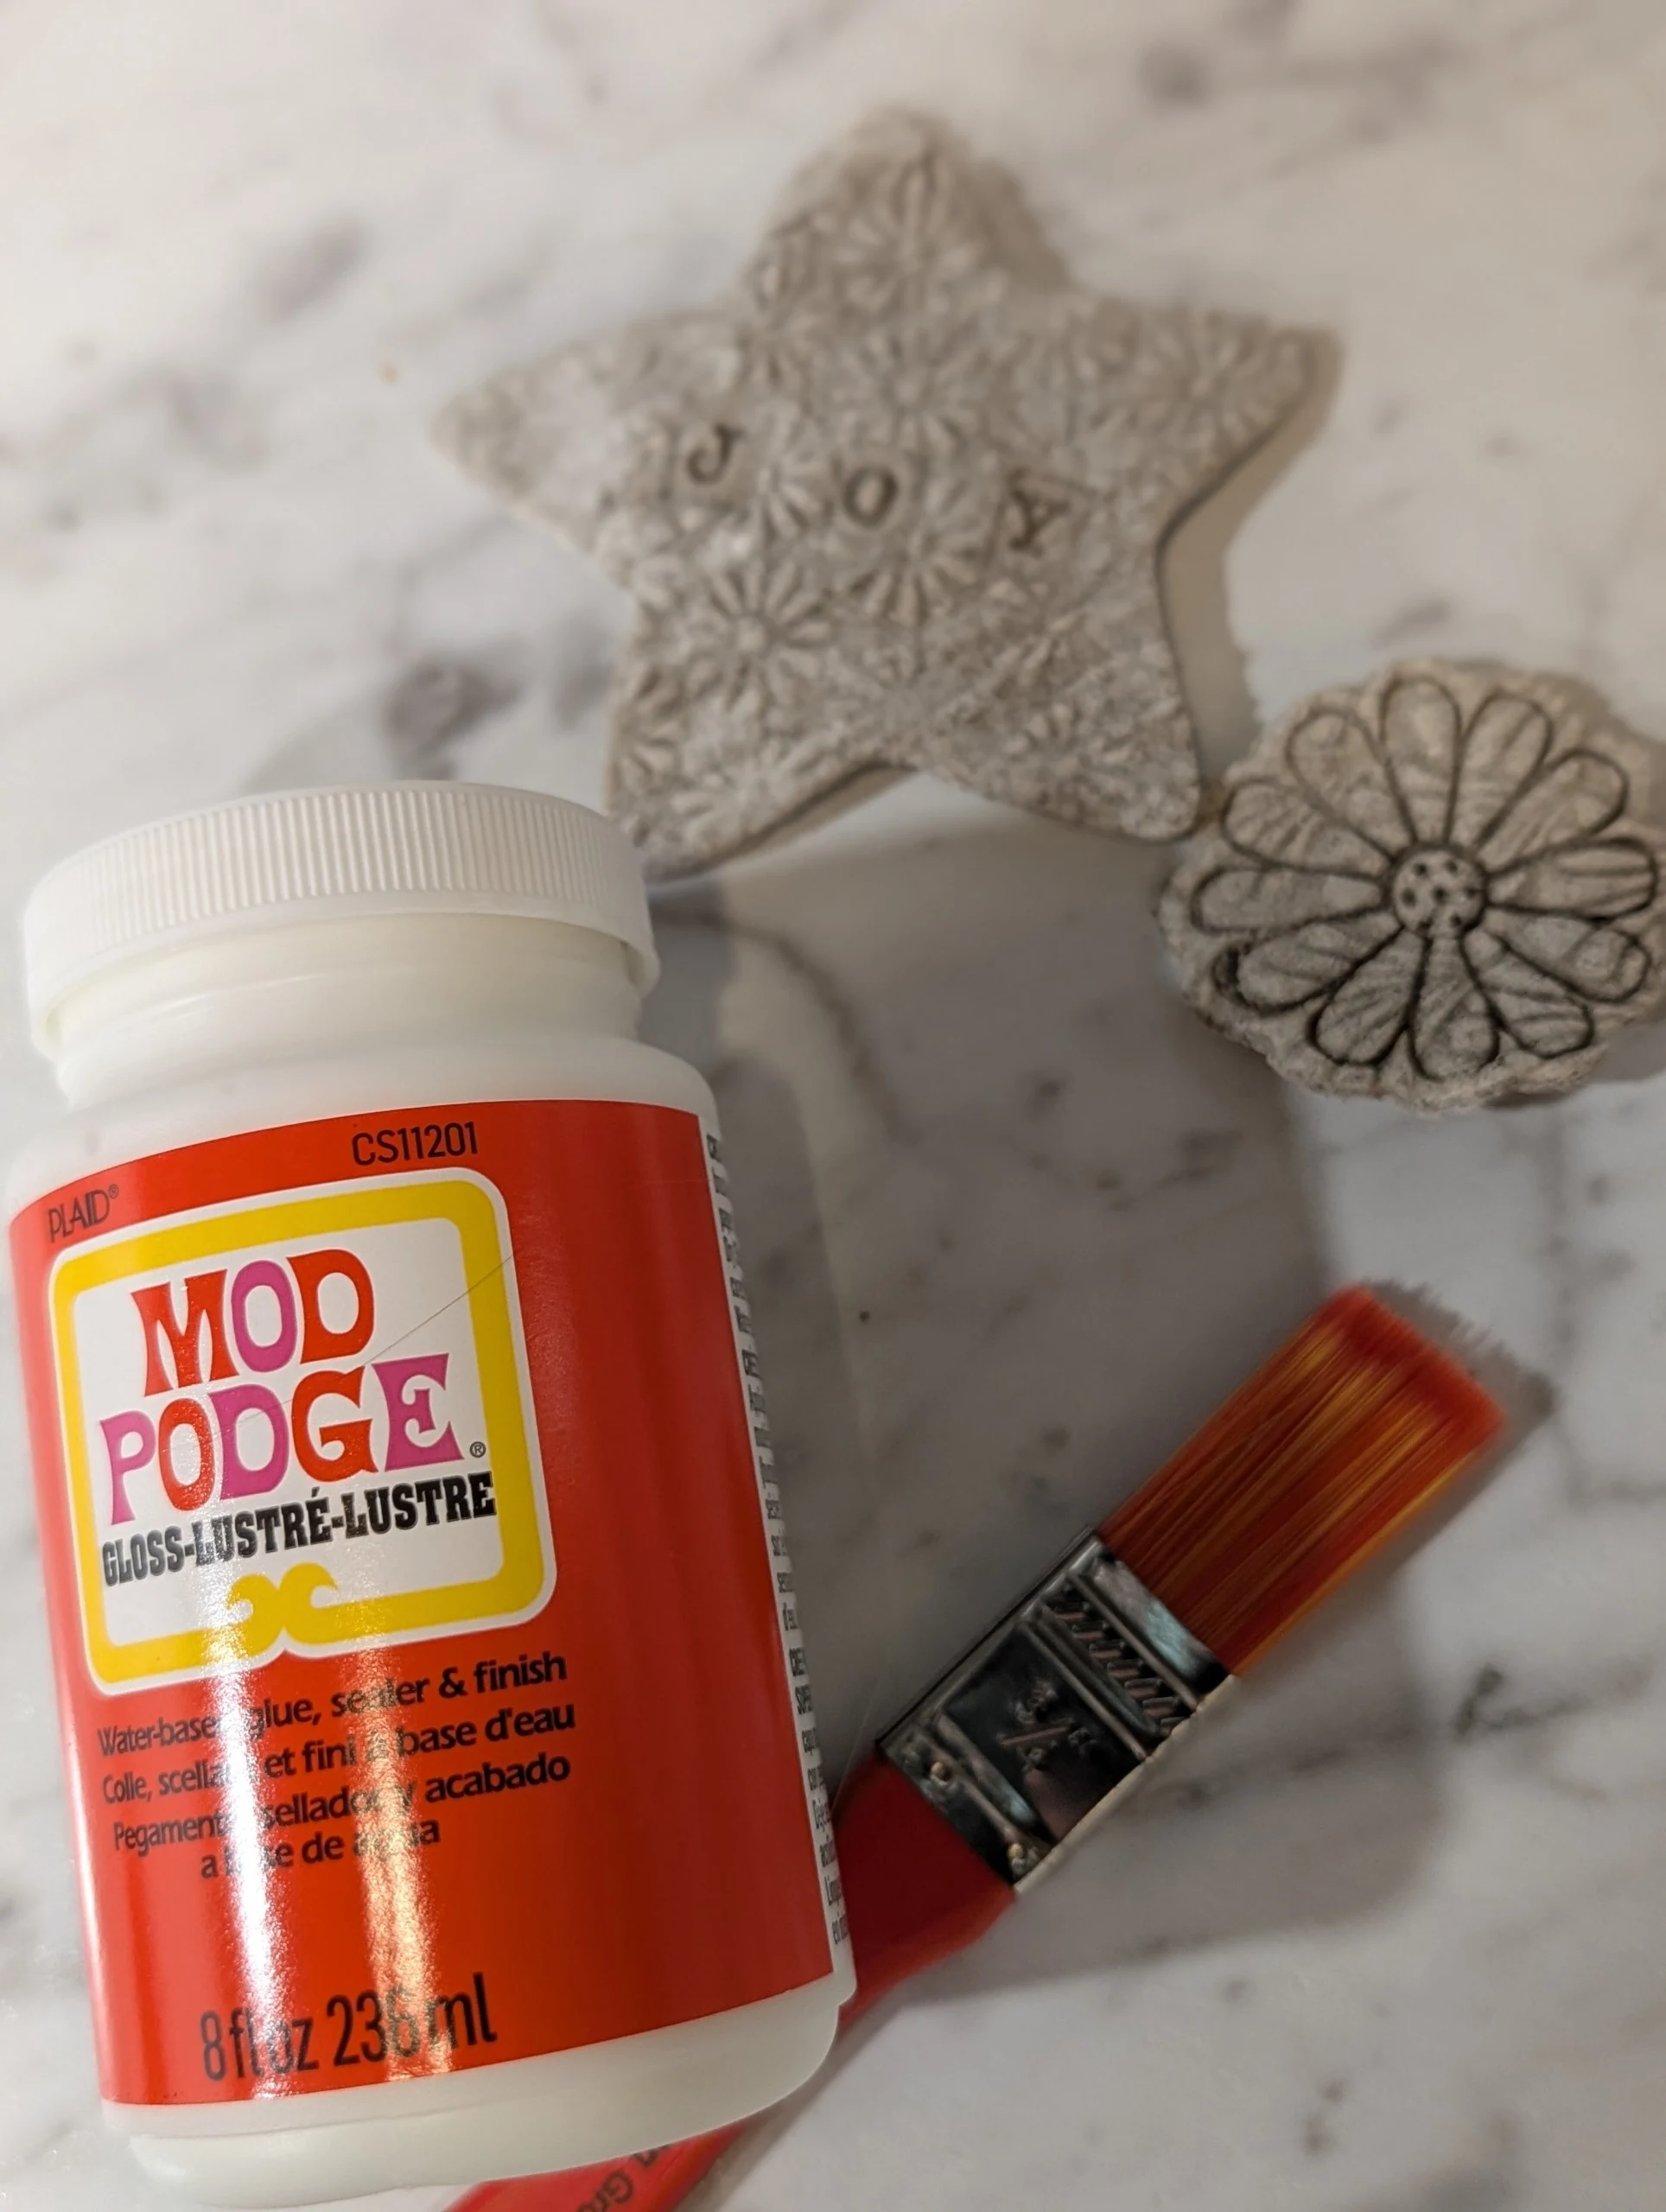
- Optional: For a glossy and slightly stronger ornament, paint a layer of Mod Podge over the ornament.
---
How Thick Should Salt Dough Be?
About 1/4 inch thick is the sweet spot for most salt dough recipes. At this thickness, they are sturdy and still dry in that 2-3 hour time frame.
You can experiment with thicker or thinner but there are some downsides:
Thinner than 1/4 inch: They do dry faster, but it is also more likely to warp or curve as it dries. This isn't always a bad thing! I made a thinner star ornament then wrapped it around a 1.6 oz stainless steel cup to create a mini star bowl. The thin cutout made it easier to workwith.
Thicker than 1/4 inch: Thicker ornaments are sturdier but they take significantly longer to dry all the way through. Be prepared to give up your oven for a few more hours. Alternatively, you could let them air dry longer assuming it is not a humid day/week. The thicker you go, the more important it is to make sure the center is completely dry before storing your ornaments.
---
# Baking vs Air Drying
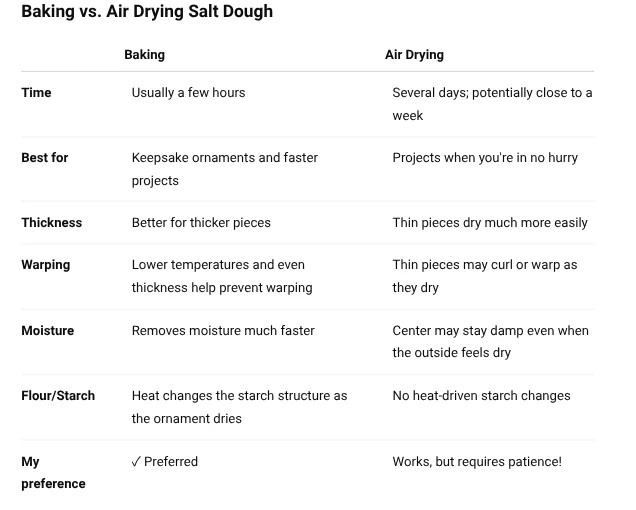
You can air dry salt dough ornaments, but baking is the preferred method.
Baking does more than simply remove moisture. Starch gelatinizes when flour, water, and heat come together. Salt complicates this process a little because salt affects how water and starch interact, and salt dough has a LOT of salt compared to normal recipes.
You don't necessarily have to give up your oven all day, though. There is a middle ground: bake the ornaments for 2–3 hours and, if they're not completely dry, let them finish air drying. The important thing is that they are completely dry before you seal or store them.
Baking vs. Air Drying Salt Dough
Why Isn't Salt Dough the Same as Air-Dry Clay?
They may feel similar while you're working with them, but they're actually pretty different materials.
Salt dough is simply flour, salt, and water. Commercial air-dry clay is specifically formulated to harden as its moisture evaporates and may contain minerals, fibers, polymers, or other binders depending on the product.
You can even make homemade air-dry clay using cornstarch, baking soda, and water. The interesting difference is that this mixture is cooked before you shape it. Cooking the cornstarch with water changes the starch and creates the clay-like mixture first. Then you shape your project and allow the remaining moisture to evaporate.
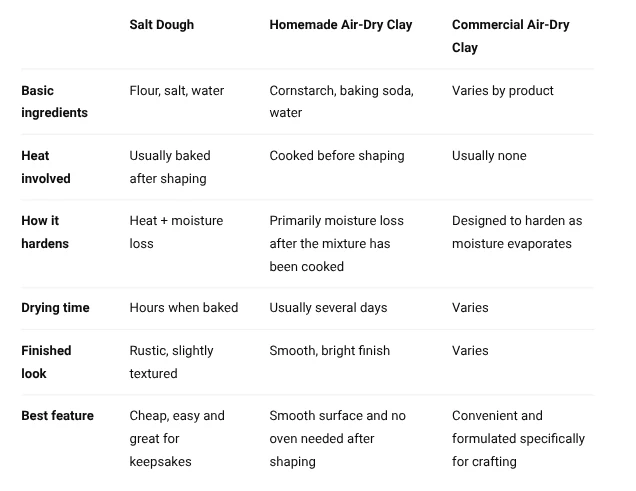
So yes, you can air dry salt dough. But if I'm putting the time into making little handprints, Christmas ornaments, or keepsakes that I want to pull out of a box 10 years from now, I'm giving them some time in the oven!
---
# Why Did My Salt Dough Crack?
A few small cracks can be normal with salt dough (it's part of that homemade charm!), but large or deep cracks usually mean the dough dried too quickly, was too dry to begin with, or wasn't rolled evenly.
Here are a few of the most common reasons:
Just remember, salt dough isn't supposed to look like perfectly smooth ceramic. A little texture and an occasional small crack are completely normal, especially for a kids craft.
If an ornament develops a large crack or starts splitting apart, though, I would remake it rather than trying to seal over it. Mod Podge is helpful for strengthening but it can only go so far!

---
Can You Use Used Coffee Grounds?
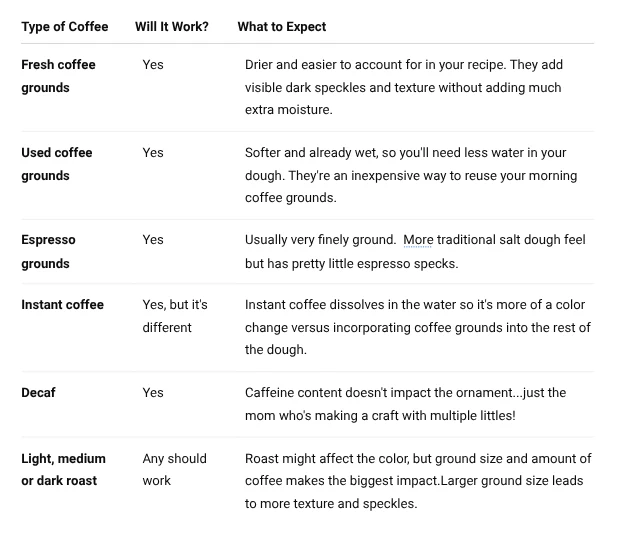
You can use both fresh and used coffee grounds for salt dough ornaments and crafts, but they do behave differently. I prefer used coffee grounds because you're getting one more use out of something that would otherwise end up in the trash (or compost!).
Used coffee grounds straight from the coffee maker are holding a good amount of water. Give them a good squeeze or let them air dry (remove the lid on the coffee maker or take out the basket) before adding them to your dough. I would also incorporate the coffee grinds first and then add water. Traditional salt dough recipes call for 1/2 a cup but I would start with a 1/3 a cup when including coffee grounds.
---
# Decorating Coffee Ground Ornaments
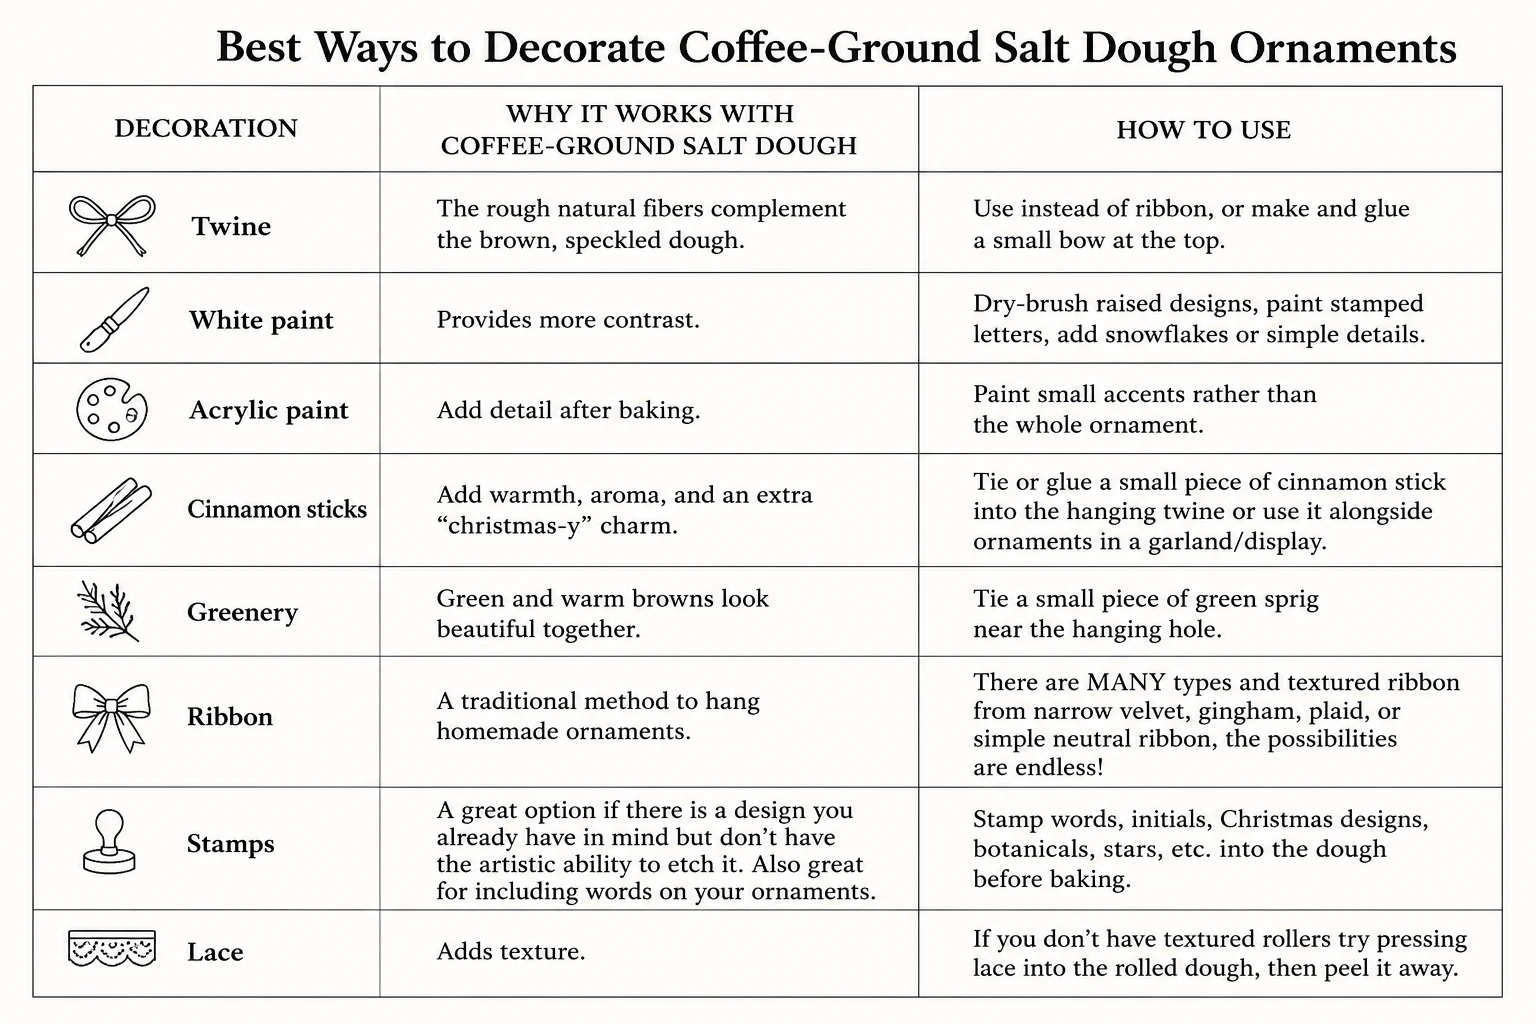
There are numerous ways to level up your coffee ground salt dough ornaments from twine, white paint, acrylic paint, cinnamon sticks, greenery sprigs, ribbon, stamps, and even lace!
---
# Christmas Ornament Ideas
If you have a cookie cutter in the shape of it, you can make a homemade christmas ornament out of it! Some great cutout ideas are:
- Stars
- Trees
- Snowflakes
- Gingerbread
- Angels
- Nativity
- Hearts
Be aware that highly detailed cut outs or embossed stamps or cookie cutters may be harder to remove from the dough or may look slightly off after the dough bakes and goes together.
---
# Handprint Coffee Ground Ornaments
If you're looking for a cute keepsake, press your child's hand into the dough to make an imprint then bake the dough.
For simple shapes/cutters: If you roll your dough slightly thicker and cut out your initial shape (circle, square, heart), you can gently roll out the dough a little more so that your little one’s hand fits into the shape’s center.
---
# Paw Print Ornaments
If you have a cooperative pooch, you might be able to get a paw print ornament too. Follow the same steps as the handprint idea but have lots of great doggy treats around for Fido!
---
# Baby Keepsake Ornaments
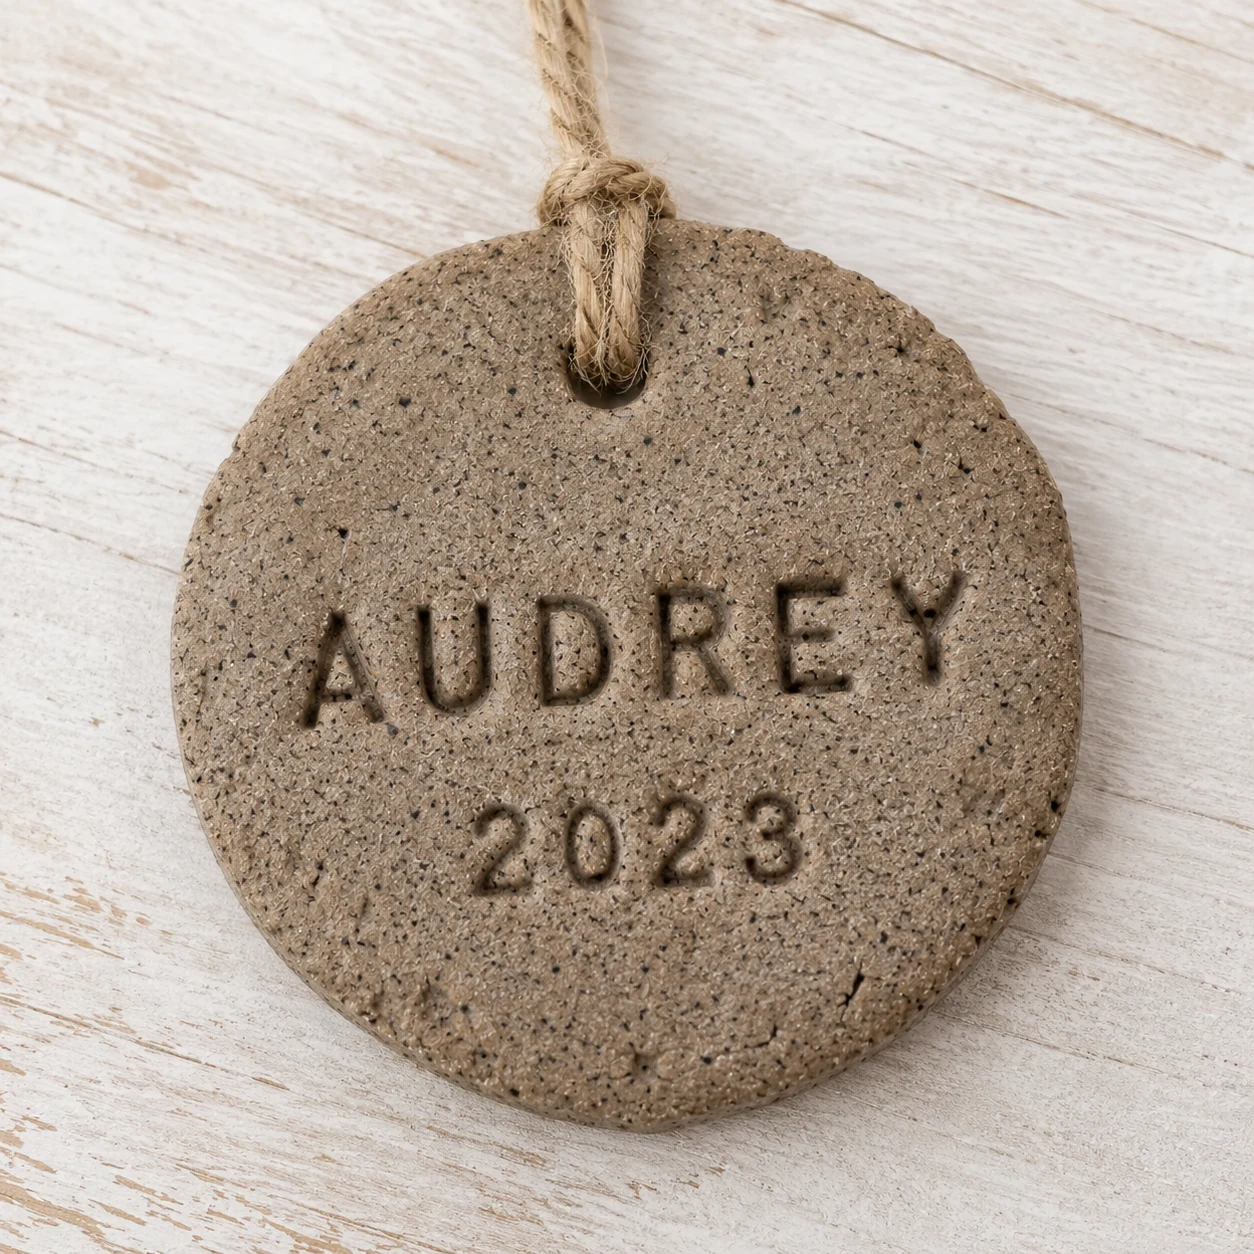
This could be a little hand print, foot print, or just a stamped name and year.
---
# Gift Ideas
If you’re looking for an inexpensive and homemade gift you can make these for teachers, grandparents, neighbors, and secret santa. They are great gift tags that also double as a gift!
---
# How to Seal Salt Dough Ornaments
I’ve only used Mod Podge. Once the ornaments have FULLY cooled, you can paint a thin layer of sealant on each side. Let each side dry before painting the other side to keep the ornaments from sticking to the surface you lay them on to dry. Mod Podge does take about 30 days to cure so the more hands off you can be before they cure the better, especially if you’re hoping to store them for decades.
---
# How Long Do They Last?
Salt dough ornaments can last for decades if you're careful with them! Moisture and breakage are really the two biggest enemies. Make sure your ornaments are completely dry before storing them, and avoid humid areas like damp basements. You can store them in a box with layers of wax or parchment paper between the ornaments to help protect them from rubbing and breaking. You can also toss a few silica gel packets into the storage box to help control moisture. Make sure to handle them gently and keep them dry if you want to pull those little handprints and homemade ornaments out year after year. These are not ceramic keepsakes so have a realistic expectation!
---
# Can Kids Help?
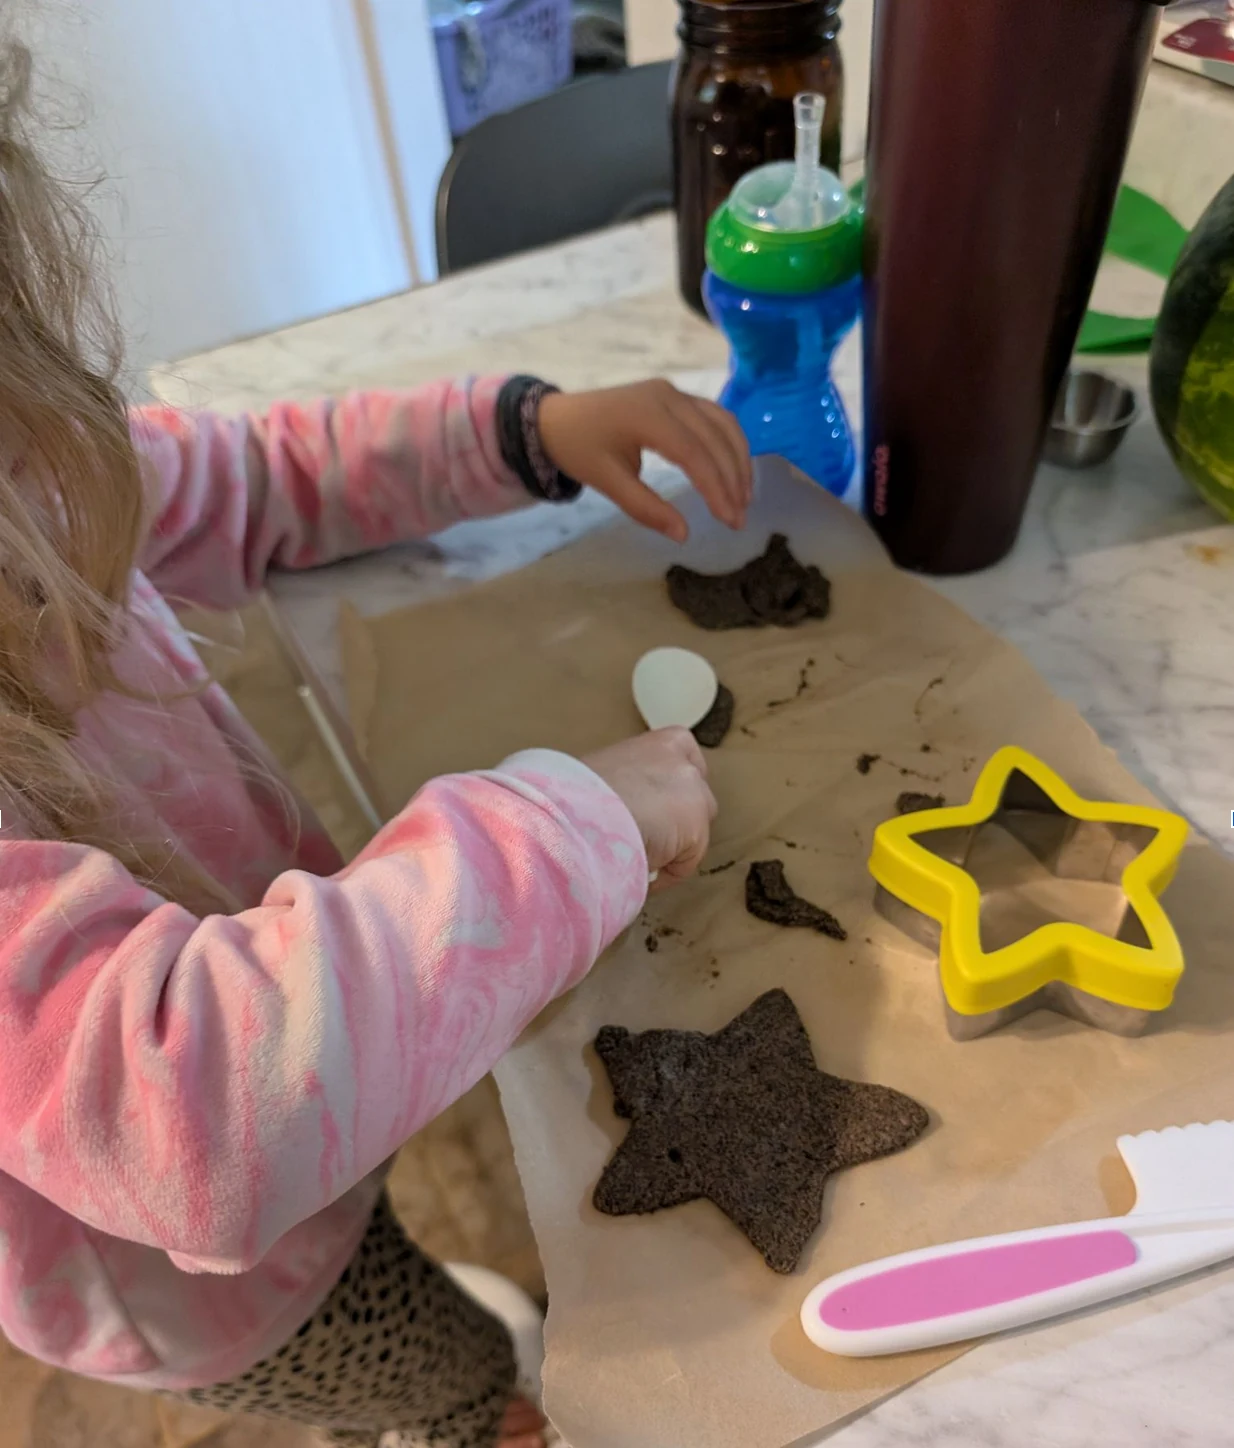
Yes, yes, and yes! My kids love this activity. It’s messy but less messy compared to sugary and stick cookies. They love playing with the leftover scraps that didn’t make it into ornaments.
---
# Tips:
- Roll evenly.
- Don't make them too thick or they may not bake all the way through or take forever to bake
- Don’t make them too thin or they will curl up as they bake and dry.
- Place the hole before baking. You can use a toothpick instead of a straw but you need to create a big hole. As the dough bakes and dries, a small hole will essentially close up.
- Let them cool completely.
- Mod Podge definitely needs time to cure!
---
# Coffee Ground Salt Dough Ornament FAQs
- Can I refrigerate the dough? Absolutely! You can wrap it in cling wrap and place it in a closed container. I’ve never gone past a week. If it seems a little dry when you pull it back out, add a small amount of water and knead it again.
- Can you air dry salt dough instead of baking it? Yes, but it will take days instead of hours. Depending on the thickness of your ornaments and the humidity in your house, it could take several days or even close to a week. I prefer baking, or baking for a few hours and then allowing them to finish air drying.
- Do salt dough ornaments expand in the oven? Minimally. They shouldn't puff up like cookies, which is why stamped designs and little handprints can work so well.
- Can kids play with salt dough like Play-Doh? Yes! It’s a great way to use up all the scrappy pieces left over after cutting out your ornaments. Just remember that salt dough isn't edible.
- How can I tell when salt dough ornaments are done? They should feel hard and dry rather than soft in the center. Thicker ornaments will take longer, and the outside can sometimes feel dry before the inside actually is.
- How long do salt dough ornaments last? If they are completely dried, sealed, stored properly, and handled carefully, potentially decades!
- How should I store salt dough ornaments? Moisture is the enemy! Make sure your ornaments are completely dry before storing them. I prefer wax paper or parchment paper between ornaments or layers. You can also add a few silica gel packets to the storage box to help with moisture. Avoid storing them somewhere damp or very humid.
- Can I use gluten-free flour? You can experiment with gluten-free flour, but don't expect it to behave exactly like traditional all-purpose flour. Gluten helps give regular flour dough some structure and workability, so a gluten-free version may be more crumbly or fragile depending on the flour blend you use.
- Can dogs eat salt dough? No! Salt dough contains a very large amount of salt and should not be eaten by dogs or other pets. Keep both the raw dough and finished ornaments somewhere pets can't chew on them.
- Are salt dough ornaments mold resistant? Not completely. The high amount of salt and low moisture of a properly dried ornament make it a pretty unfriendly environment for mold, but an ornament that retains or absorbs enough moisture can still develop mold. Completely dry your ornaments before sealing or storing them and keep them away from humidity.
- Why is my salt dough ornament still soft? There's probably still moisture inside. Thick ornaments, dough made with too much water, high humidity, or simply not enough drying time can all contribute. Give it additional time in a low oven or allow it to continue air drying.
- Can I add cinnamon to salt dough? Yes! Ground cinnamon can add color, little speckles, and some cinnamon aroma to your dough. Keep in mind that adding a significant amount of another dry ingredient can change the texture, so you may need to adjust your water slightly.
- Can I add essential oils to salt dough? You can add a few drops for scent, although I wouldn't rely on the fragrance lasting forever. Also keep in mind who will be handling the ornaments and whether pets or young children may have access to them.
- Can I paint salt dough before baking? No, ideally wait until they are done baking, fully dried. That way you're decorating a dry, hard surface and aren't introducing another variable while the ornament is trying to dry.
- Can I use whole wheat flour? Yes, but expect a different appearance and texture. Whole wheat flour contains the bran and germ, so your ornaments may look darker, more speckled, and a little more rustic than those made with all-purpose flour.
- Can I make salt dough ornaments ahead of time? Absolutely. You can refrigerate the unbaked dough for a short period, but for longer-term planning I'd rather make, bake, and completely dry the ornaments ahead of time. Then you can save the painting and decorating for later.
---
# More Homemade Christmas Crafts You'll Love
- Plain Salt Dough
- Colored Salt Dough
- Homemade Play Dough
- DIY Beeswax Wraps
- Homemade Chapstick